-
django CBV HomeViewProject using python/Cloning Airbnb 2021. 2. 26. 10:22
모든 model들을 완성하였으니 웹 페이지(view)를 만들 차례다.
urlsettings.py
Diretory path 설정
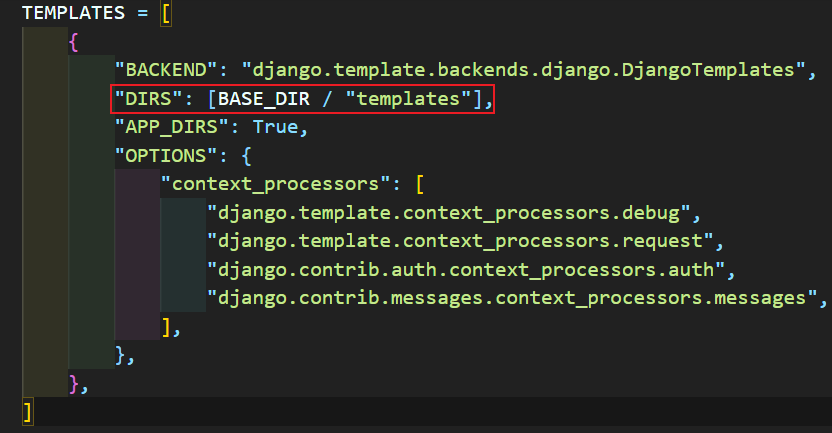
settings.py에 TEMPLATES list에 있는 DIRS에 다음과 같이 directory 경로를 추가해준다.
settings.py urlpattenrs
config/urls.py
config/urls.py에 urlpatterns에 app의 url 경로를 추가해줘야 한다. include의 첫번 째 인자는 <app_name>.urls다. namespace는 core app에 있는 urls.py에 선언된 app_name이다.

config/urls.py core/urls.py
$ django-admin startapp core위 명령어를 쳤을 때 urls.py는 생성되지 않기 때문에 우리가 임의의로 생성해줘야 한다. 4 line에 app_name은 config/urls.py가 찾아갈 수 있는 app의 이름이다. core/urls.py에 app_name이 config/urls.py에 있는 namespace다.
path의 첫번째 인자는 url 경로다. ""로 되어 있는 것은 root url. 즉, http://127.0.0.1:8000/ 이다. 두 번째 인자는 user가 저 경로에 도달했을 때 실행되는 함수다. room_views는 views file이고 HomeView는 room_views에 만들어진 class View다. View를 작성하는 방법은 두 가지인데 하나는 Function Based View이고 나머지 하나는 Class Based View다. 나는 여기서 CBV 방법으로 View를 작성했다. CBV로 작성했을 경우 as_view() method를 사용해야 한다(만약 FBV로 했을 경우 room_views.<function name>으로 끝내면 된다.). 마지막, name="home"은 .html 파일에서 {% url %} 이라는 template tag를 사용할 때 사용된다. 예를 들어 다시 http://127.0.0.1:8000/rooms/423/detail 이라는 page에 있을 때 http://127.0.0.1:8000/page로 다시 돌아가고 싶다면 <a href="{% url 'core:home' %}">이라고 하면 된다.({% url 'namespace:name' %} 이다.)

core/urls.py CBV(Class Based View)
rooms/views.py
CBV는 django에서 만들어 놓은 여러가지 generic class가 있다. 이를 상속 받아서 CBV를 만들고 여러 가지 설정 값을 줌으로써 page를 만든다. FBV는 모든 것을 내 맘대로 할 수 있어 자유도가 높지만, code가 굉장히 길어진다. 반면에, CBV는 CBV rule을 따라야 하지만 몇 개의 설정 값으로 code를 엄청나게 줄일 수 있다. 그리고 CBV가 제한적이라도 FBV에서 할 수 있는 것은 왠만하면 다 할 수 있다.
from django.views.generic import ListView from . import models class HomeView(ListView): model = models.Room template_name = "pages/root/home.html" context_object_name = "rooms" paginate_by = 12 paginate_orphans = 6 ordering = "created" def get_context_data(self): page = int(self.request.GET.get("page", 1)) page_sector = (page - 1) // 5 page_sector = page_sector * 5 context = super().get_context_data() context["page_sector"] = page_sector return context- model : template에 전달할 context object다. html 파일은 해당 context object를 받아서 html code에 따라 화면에 표시한다. {{rooms}}를 통해서 html 파일에서 사용할 수 있다.
- template_name : rendering할 template의 경로다. settings.py에 정의한 "templates"를 초기 경로로 인식한다.
- context_object_name : model에 담겨진 model의 이름을 정의한다.
- paginate_by : django는 paginator라는 것이 있다. paginate_by가 12라는 것은 rooms의 개수를 12개씩 자르고 page를 나눈다는 것이다. 예를 들어, rooms의 room object가 총 200개라고 했을 때, 200 // 12 == 17 page가 나온다. 200 // 12의 몫은 16이지만 나머지가 17page에 들어가기 때문이다.
- paginate_orphans : 마지막 page가 개수가 paginate_orphans 이하이면 그 나머지를 이전 page와 합친다. 즉, 12개씩 자른 page에 마지막 page가 6개가 남았다면 마지막 page는 16 page가 되고 총 18개의 room이 있다는 뜻이다.
- ordering : model을 정렬한다. 만약 -(dash)를 앞에 붙이면, 예를 들어 "-created"로 하면, 역순으로 정렬된다.
- get_context_data(self) : "rooms" 이외에 추가로 context를 전달할 때 사용한다. 나는 page_sector라는 variable을 전달해주고 싶어서 context = super().get_context_data()를 해준 후에 context["page_sector"] = page_sector를 해주고 return 해줬다.
templates
base.html and {% block %}
html 파일이다. 하지만 보통의 html 파일과 다른 점이 있다면 {% %} 기호일 것이다. 이것은 python의 template tag라는 것이다. 이를 이용해서 html 파일에서 변수나 for이나 if 문을 사용할 수 있다.
여기서 {% block content %}은 다른 html 파일이 base.html을 {% extends %} 할 때 해당 블록을 대체할 수 있는 영역이다.
<!DOCTYPE html>
<html lang="en">
  <head>
    <meta charset="UTF-8" />
    <meta http-equiv="X-UA-Compatible" content="IE=edge" />
    <meta name="viewport" content="width=device-width, initial-scale=1.0" />
    <link rel="stylesheet" href="https://use.fontawesome.com/releases/v5.11.2/css/all.css">
    <title>{% block page_title %}{% endblock page_title %} | Hairbnb</title>
  </head>
  <body>
    {% block content %}{% endblock content %}
  </body>
</html>
pages/root/home.html and {% block %} & {% include %}
home 파일이다. base.html처럼 {% block content %} {% endblock content %}가 있다. 하지만 block 안에 html 코드도 있다. 그리고 첫번째 줄에 {% extends 'base.html' %}이 있다. extends는 class 상속과 비슷한다. base.html 코드를 그대로 가져오고 block 부분은 자신의 block 부분으로 교체한다.
extends가 code를 확장하는 거라면 {% include %}는 code를 가져오는 것이다. mixins는 보통 자주 사용되는, 그리고 중복되는 code의 조각이 있다. 그 중 mixins/room_card.html을 가져오고 with를 사용해서 rooms object를 전달해줬다. with 뒤에는 key=value로 object를 전달해줄 수 있다. page_number.html도 마찬가진다.
{% extends 'base.html' %}

{% block page_title %}Home{% endblock page_title %}

{% block content %}
  <div>
    <div>
      {% include 'mixins/room_card.html' with rooms=rooms %}
      <div>
        {% include 'mixins/page_number.html' with page=page_obj %}
      </div>
    </div>
  </div>
{% endblock content %}
mixins/room_card.html and mixins/page_number.html
home.html로 받은 rooms와 page다.


빨간색 박스가 rooms이고 파란색 박스가 page다.

참고 자료
- 노마드 코더의 Airbnb 클론 강의
- ListView
소스 코드
github.com/zpskek/airbnb-clone-v3/commit/0d10adb1cb047ab19980c11547f6faae622a789c
'Project using python > Cloning Airbnb' 카테고리의 다른 글
page_number.html (0) 2021.02.26 room_card.html and model function (0) 2021.02.26 Custom Commands and django-seed (0) 2021.02.25 Create Conversation Model and Admin (0) 2021.02.24 Create List Model and Admin (0) 2021.02.24